Finally, GW has produced a piece of dwarf - sorry, duardin - themed scenery. Fyreslayers got a very nice new update recently which included three Magmic Invocation models, and a Magmic Battleforge that provides a couple of interesting buffs to everyone's favourite flame-haired fanatics. I was really excited for this release and so set to painting the invocations and the forge as soon as I got them home. Since I wasn't overly keen on the example on the box for the forge (way too much gold) I decided to go with something that meshed more nicely with the colours of my army.
My Fyreslayers are from a place called Ashenhold, which is a citadel that stradles the realms of Fire and Death via a realmgate deep within the keep. The Hrukvorn Lodge (as I have named them) venerate the duardin god of death - Gazul - almost as much as they do Grimnir. Because of this, there is a lot of black in their weapons, armour (well, what little there is) and iconography. And I wanted my battleforge - a piece that would be appearing on the tabletop irrespective of the construction of my army henceforth - to reflect the grimness and stoicism of the Hrukvorn Lodge. And that is why I have painted it as I have.
A number of people asked me how I painted the forge, so I have written this guide to help them first and foremost, but hopefully also to help some others. Maybe you'll even be able to adapt some of my ideas into other projects?
Priming
Paints Used: Chaos Black Spray, Corax White Spray
Nothing too complicated here. Spray the whole thing black all over and spray a bit of white on the areas that are going to be aflame; namely, the plume at the top of the model, the two braziers at either side, and the furnace itself. Some people might suggest keeping the model in sub assemblies but I didn't bother with that. Just remember that if you're using sub assemblies to cover the areas that will be glued with putty or tack before priming; plastic glue needs to bond to plastic for a proper join.
You don't necessarily have to prime the flaming areas white, but it does help with the flame effects later on. If you do decide to use the GW white primer (Corax White), remember to shake it well and hold the can in an upright position when spraying, keeping the can about 20cm away from the surface being primed. This primer is notoriously tempremental and will create a lumpy, chalky effect on your models if you don't use it as I have described.
Basecoating
Paints Used: Abaddon Black, Leadbelcher, Mournfang Brown, Jokaero Orange, Balthasar Gold, Rhinox Hide, Zandri Dust
If you sprayed the flaming areas as I did, you'll need to get those tidied up with Abaddon Black at this stage. I also painted the braziers themselves black for better contrast, along with the pillars. The rune-inscribed panels, riveted borders, beard eye mask and mechanisms at the rear of the forge were painted to look like iron or steel using Leadbelcher. Ancestor icons, pipes, tanks and runes were all painted with Balthasar Gold at this stage, though you may want to leave the runes on the beard until after the enamel effect has been achieved. Brick and stone was painted Mournfang Brown (including the furance proper), and the flaming areas were all basecoated Jokaero Orange. The bellows were painted using Rhinox Hide and Zandri Dust.
It's good to get a minimum of two basecoats on areas where you want to achieve a solid block of colour. You'll need to use a bit of your own judgement here; sometimes I find that two coats is sufficient, but I've often used three before I was able to attain the desired effect. The plume at the top of the forge is an exception to this; because we want it to look smokey, it's good to transition into thinner layers as you climb up the plumes. We'll look a bit further into that later.

Rather than go through all the layers I did for everything, I want to zero in on what I believe to be the key elements of the model and discuss those in depth. The following sections will detail how those key elements were painted from their respective basecoats.
Black Panels
Paints used: Abaddon Black, Skavenblight Dinge, Nuln Oil
The domed part of the "helmet" (the forehead?) and the other black panels were just painted Abaddon Black, drybrushed Skavenblight Dinge, then washed with Nuln Oil. Done.
I like the blacks in my army to look really dark - like charcoal - so I don't highlight up too much. As long as you get some dark grey or blue on black it'll look fine - no need to get fussy about it. Besides, Fyreslayers tend to have a lot of bright, fiery colours, too, so you don't need to worry about contrast so much.
The braziers and the magmadroth figurehead I took a bit more time on and painted the Skavenblight Dinge highlights onto them with a small detail brush. It's nice to retain the detail as much as you can.
Brick/Furance Walls
Paints Used: Mournfang Brown, Agrax Earthshade, Zandri Dust, Reikland Fleshshade
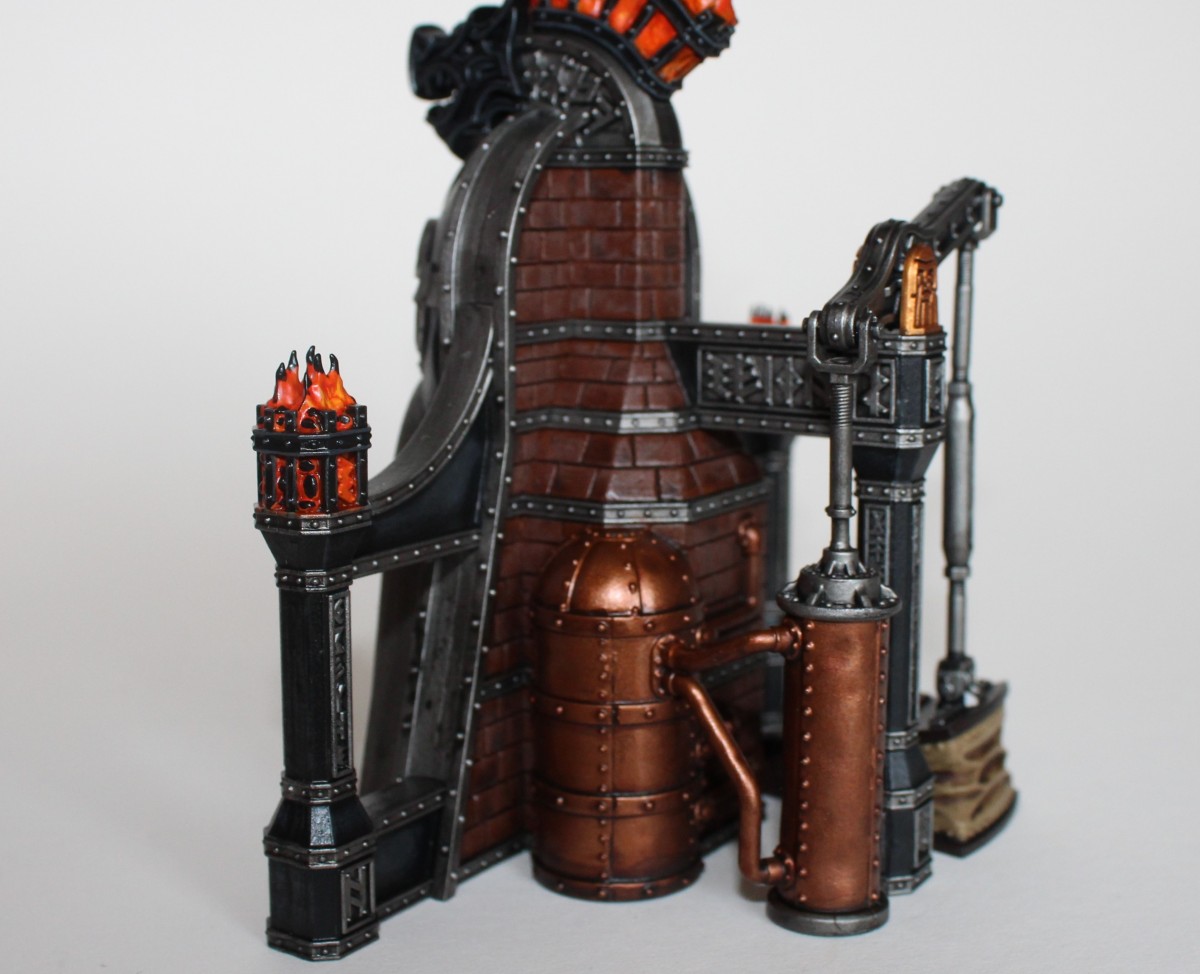
I wanted the bricks to look like traditional, clay-based bricks. This helps to reinforce the industrial feel that the battleforge has; it's equal parts shrine and machine, and you almost feel that you're looking at two different models depending on which side you're currently looking at.
From the Mournfang Brown basecoat, I did an all-over wash of Agrax Earthshade to give the brickwork depth, but also to darken it down slightly. We call them red bricks but there's really a lot of brown in them. I then lightly drybrushed the brickwork with Zandri Dust to weather and give more texture, and finished them off with an all-over wash of Reikland Fleshshade.
The Beard
Paints Used: Leadbelcher, Nuln Oil, Blood For the Blood God, Balthasar Gold, Gehenna's Gold, Ironbreaker
The most important part of any dwarf/duardin model!
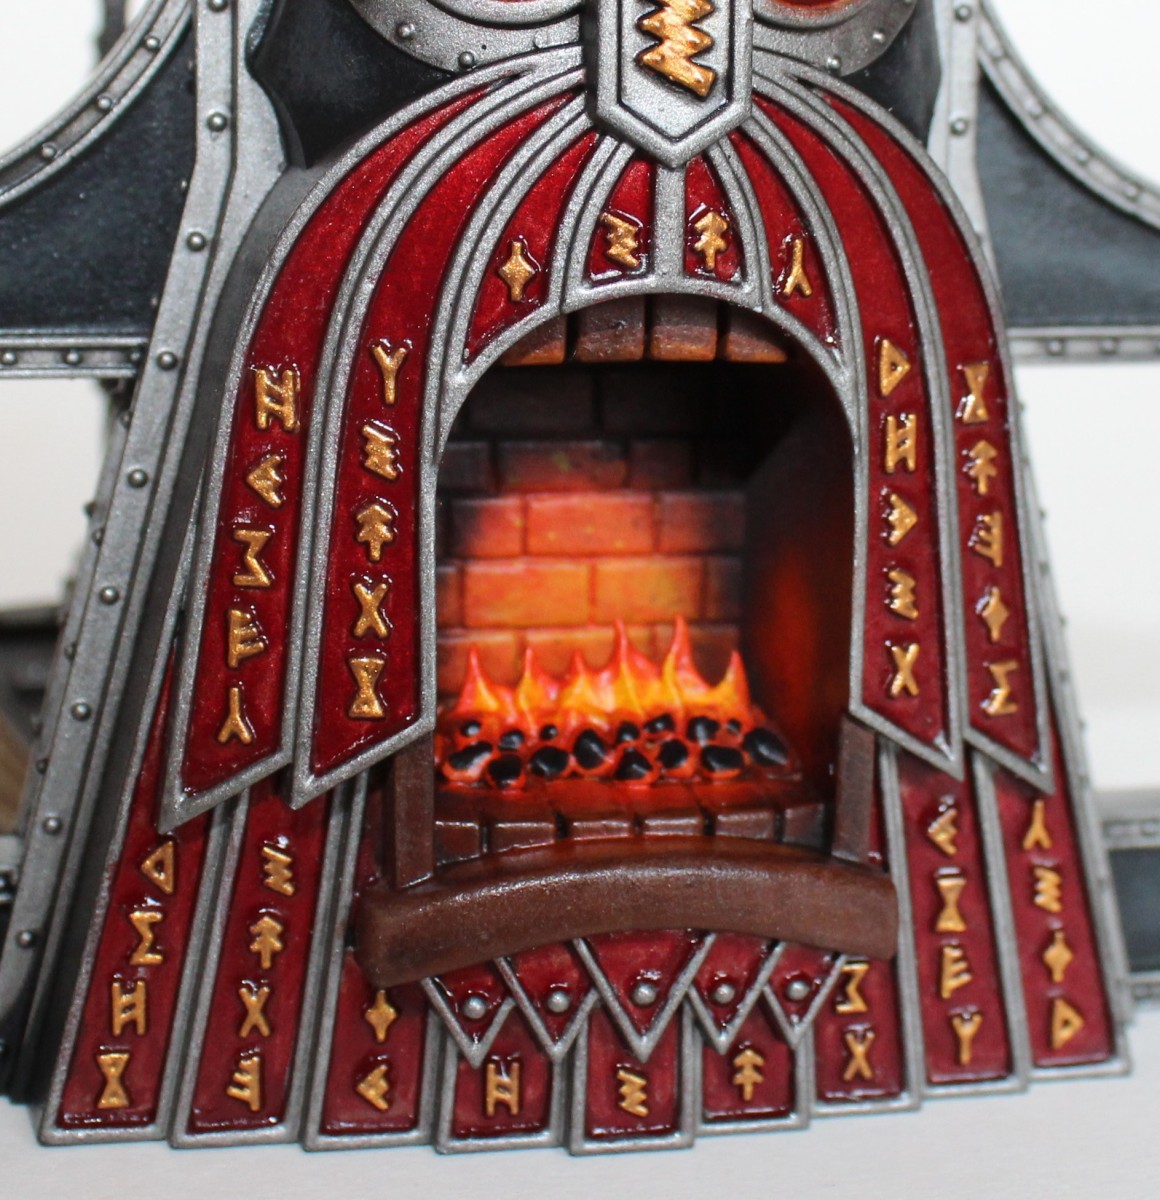
All of the iron-coloured parts of the model got an all-over wash with Nuln Oil and this was no exception. Depth and detail.
The red enamel is simply several layers of Blood for the Blood God - that's it. It isn't thinned down with water, and it isn't mixed with a medium. If it ends up patchy or streaky, don't worry - just put another layer over it. Good, characterful enamel is full of imperfections, and I wanted to relfect that. Blood for the Blood God is a difficult paint to control, so you'll almost certainly have to tidy up the borders with a bit more Leadbelcher. Avoid applying any more washes to areas with Blood for the Blood God - they won't take well to them.
Once the enamel effect was done, I painted in the other areas. I used Balthasar Gold and Gehenna's Gold for the runes, and put a little Ironbreaker to make the higher up steel-coloured areas of the beard look more refelctive. The reason that I used a more intense gold for the runes here is because gold takes on a more yellow, brassy colour the more impurities it contains. I imagined that the forge was decorated with spent ur-gold runes.
The Furnace
Paints used: Jokaero Orange, Fuegan Orange, Trollslayer Orange, Yriel Yellow, Cassandora Yellow, White Scar, Bloodletter, Abaddon Black (Air), Black Soot (Forge World Weathering Powder)
If I had to pick out one part of the model as the most important, I would say the furnace. The model would just be a statue without it; it's the closest thing to a heart that it has. For that reason, it's the one part of the model that I wanted to look really good as it's also the physical heart of the model and therefore the part that people's eyes will naturally be drawn to.
Once I had finished all of my basecoats, I took some thinned-down Jokaero Orange and painted a few thin layers on the areas of the walls and mouth of the furnace where I imagined the light of the fire would spread, ensuring that I built up the intensity of the layers the closer I got to the light source. Remember that it's better to build up very thin layers than to start with very intense layers and possibly make a mistake.

I washed the flames, coals and the areas of reflected light with Fuegan Orange. Then, I applied some thin layers of Trollslayer Orange on the areas that I wanted to be more intense; the areas of reflected light closer to the source, the coals and the flames should all get some love. I then painted the innermost part of the flames Yriel Yellow and highlight with White Scar to represent the more intense heat. I then blended the colours of the flame together with a glaze of Cassandora yellow. The tips of the flames, the coals and the walls were glazed with Bloodletter to better represent the red glow that fire gives off. Finally, I painted a small amount of Abaddon Black (Air) onto the coals to make them look like they were smouldering away. The reason I used the Air version instead of the regular Abaddon Black was because the Air version is much thinner and allows a little bit more of the colours below to seep through. I also use Air paints for painting tattoos on my miniatures for the same reason.
This is also probably optional, but I wanted more shadow and contrast in the furnace. To create this, I brushed on layers of the Forge World Black Soot Weathering powder into the corners of the furnace where soot and shadows would gather. I just used a dry brush and layered it on until I was happy with the intensity. Just remember to clean up after you use weathering powders as they go everywhere. And also to seal any areas you do use weathering powder on with a matte rattlecan varnish - otherwise they just come off over time.
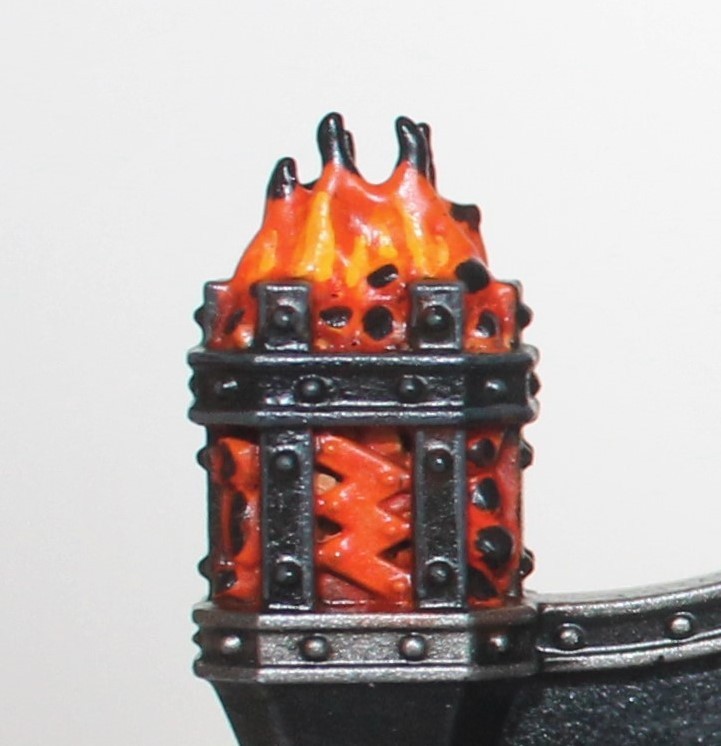
And that's pretty much it. The braziers were painted using the same colours as the furnace, though I didn't worry so much about Object Source Lighting technique there - I just really wanted to make that furnace pop. I painted the tips of the flames on the braziers black to add a bit of smokiness in there, and I stippled some sparks into the plumes of smoke on the top of the model. I wanted people to feel the heat emanating from the model just by looking at it.
This is my first stab at a painting tutorial so please let me know what you thought, and please let me see how you've painted your battleforges - it doesn't matter if you painted it differently from mine. Hell, just show me something you've painted!
Special thanks to the Fyreslayers Facebook group for encouraging me to write this article.
 Games
Games How to resolve AdBlock issue?